

Guides and Best Practices
This chapter bundles step-by-step instructions for common multi-step tasks – from writing effective instructions to setting up agents and automations to managing groups, roles, and costs. Recommendations for the effective and secure use of incoreon follow.
Agents
Guide: Writing Effective Instructions (Prompts)
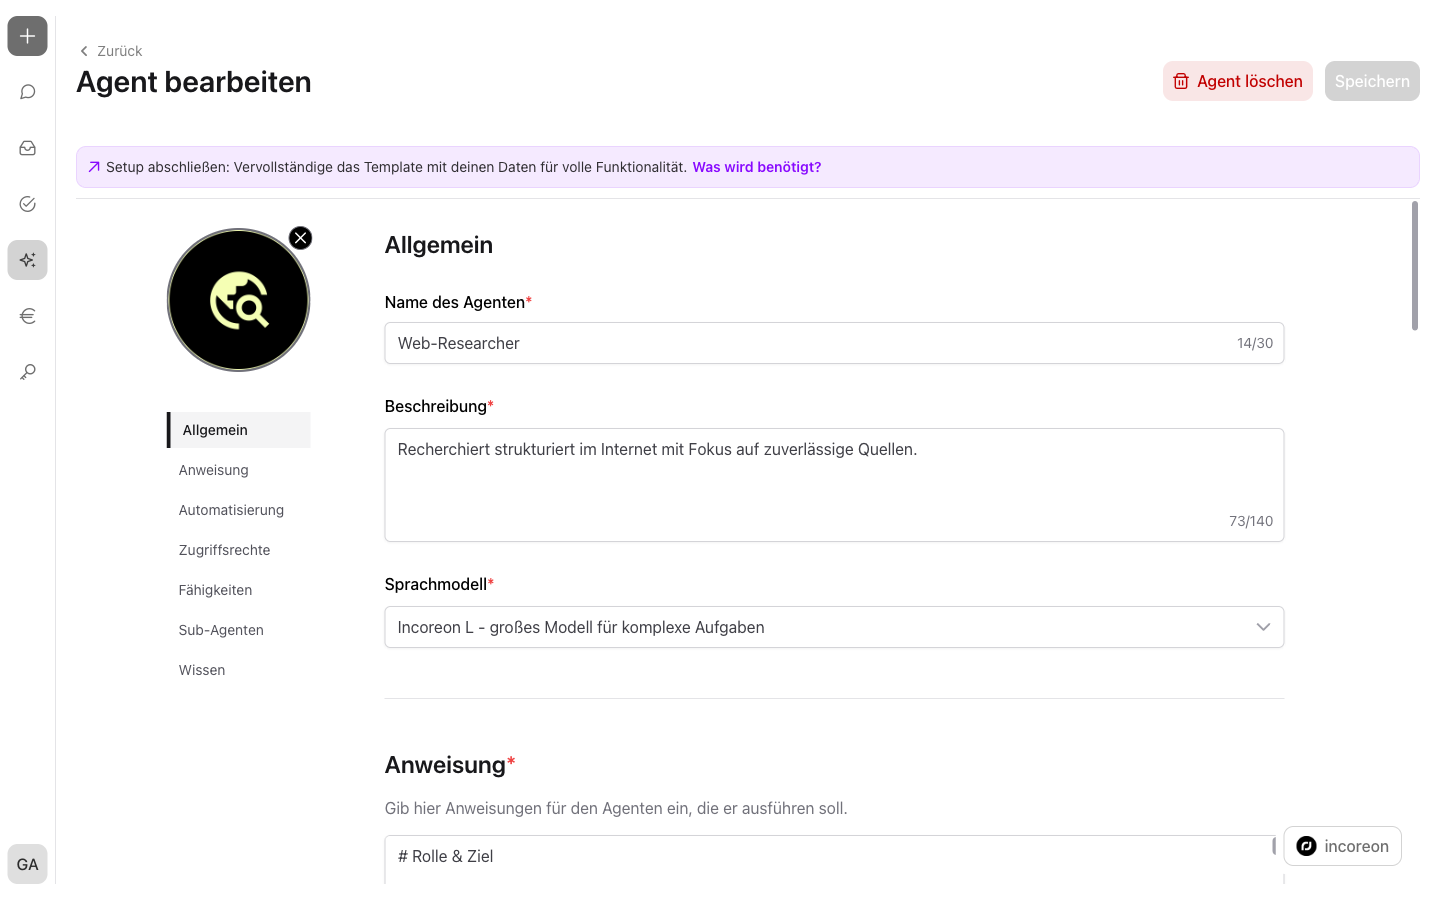
- The agent's role is defined: who the agent is – for example, a specialized HR onboarding agent.
- The task and responsibility are described: what the agent should do – and what it is not responsible for.
- Context and constraints are added: for example, the company background and relevant guidelines.
- Rules and restrictions are defined: for example, on the sharing of data or on asking questions when something is unclear.
- The output format is determined: what answers should look like – for example, bullet points or a table.
- One or two sample answers are added as examples.
- The view is switched to “Preview”. The formatted instruction appears.
- “Save” is clicked. The instruction then applies to every conversation with the agent.
- The agent is tested in the chat with a typical request. If answers do not fit, the instruction is adjusted and saved again.
Result: The instruction is now complete and tested. It applies to every conversation with the agent (see Writing the Instruction).
Guide: Creating Agents – From First Draft to Finished Solution
There are two ways to create the first draft: “Create with incoreon” – an AI assistant asks about the goal in a chat and creates the agent from the answers. “Create manually” – the configuration page opens empty. Both ways lead to the same configuration page.
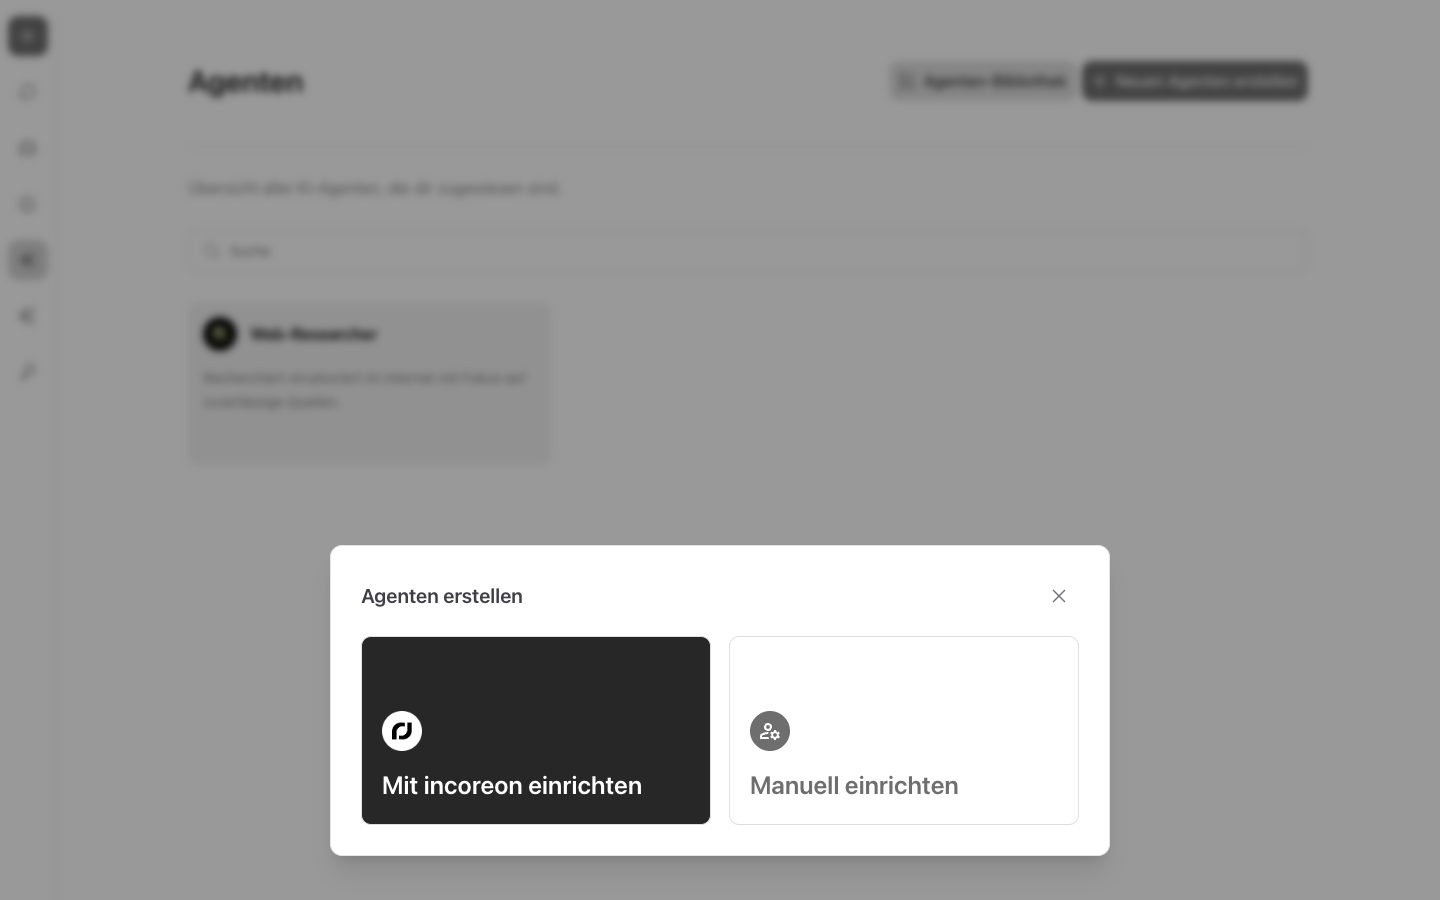
- “Create a new agent” is clicked in the agent overview. The “Create Agent” dialog opens.
- One of the two ways is selected: “Create with incoreon” starts the setup chat with the AI assistant; “Create manually” opens the empty configuration page.
- If “Create with incoreon” is selected: the AI assistant's questions are answered in the chat. From the answers, it creates the name, description, instruction, and matching capabilities.
- If “Create manually” is selected: name, description, instruction, and language model are filled in, and the agent is saved for the first time via “Add agent”. Only afterward can knowledge, sub-agents, and automations be added.
- The instruction is checked and completed (see Guide: Writing Effective Instructions (Prompts)).
- The remaining components are added as needed: capabilities, knowledge, sub-agents, and agent storage (see Agent Components in Detail).
- The access rights are defined: usage rights and editing rights. The agent must be assigned to at least one user, one group, or all users for use.
- “Save” is clicked. The changes are applied.
- The agent is tested in the chat with a typical request. If answers do not fit, the instruction and components are refined and saved again.
Result: The agent is now set up, tested, and available to the assigned users. It appears in the agent overview and in the agent selection in the chat.
Guide: Adding a Custom MCP Server
- The card of the agent is clicked in the agent overview. The configuration page opens.
- The “Tools” area is opened, and “Add MCP” is clicked. The “Add MCP” dialog opens.
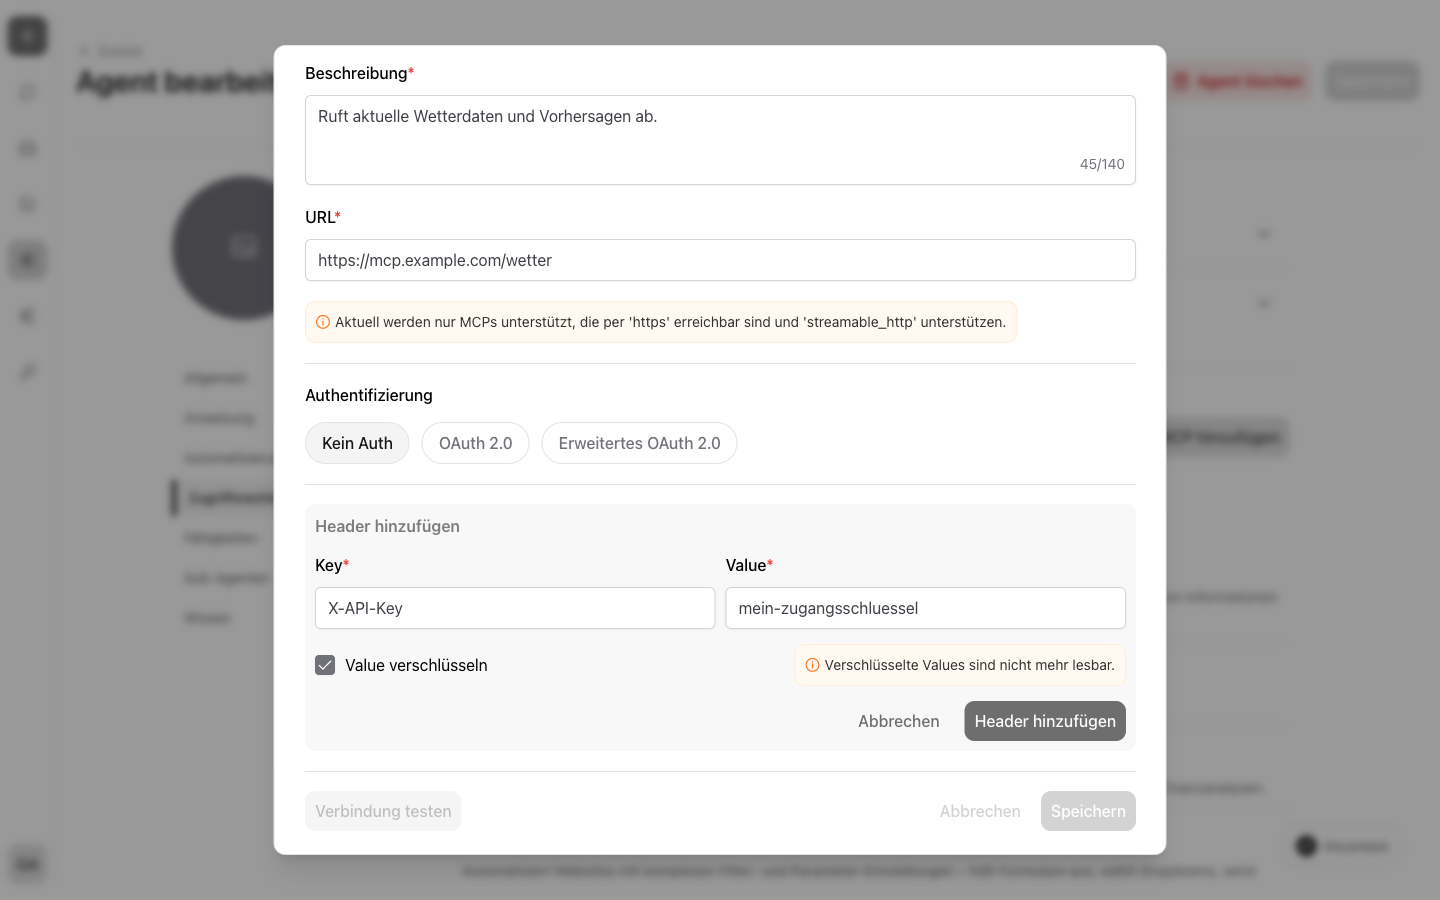
- The name and description of the capability are entered.
- The MCP server's address is entered under “URL”.
- If the server expects additional entries: the entries are added under “Header”. Values can be encrypted; encrypted values are no longer readable afterward.
- If the server requires a sign-in: the OAuth 2.0 sign-in is selected under “Authentication”, and client ID, client secret, and the further entries are entered. Otherwise, “No Authentication” remains selected.
- “Test connection” is clicked. incoreon reports whether the server is reachable.
- “Save” is clicked. The custom capability appears in the list of the agent's capabilities.
- If the capability contains tools the agent should not use: these tools are deactivated individually.
Result: The custom MCP server is now connected as a custom capability. The capability includes various tools that the agent uses in its conversations. If the connection test fails, the “Connection failed” entry in the troubleshooting helps (see Troubleshooting and Support).
Guide: Adding Knowledge to an Agent
- The card of the agent is clicked in the agent overview. The configuration page opens.
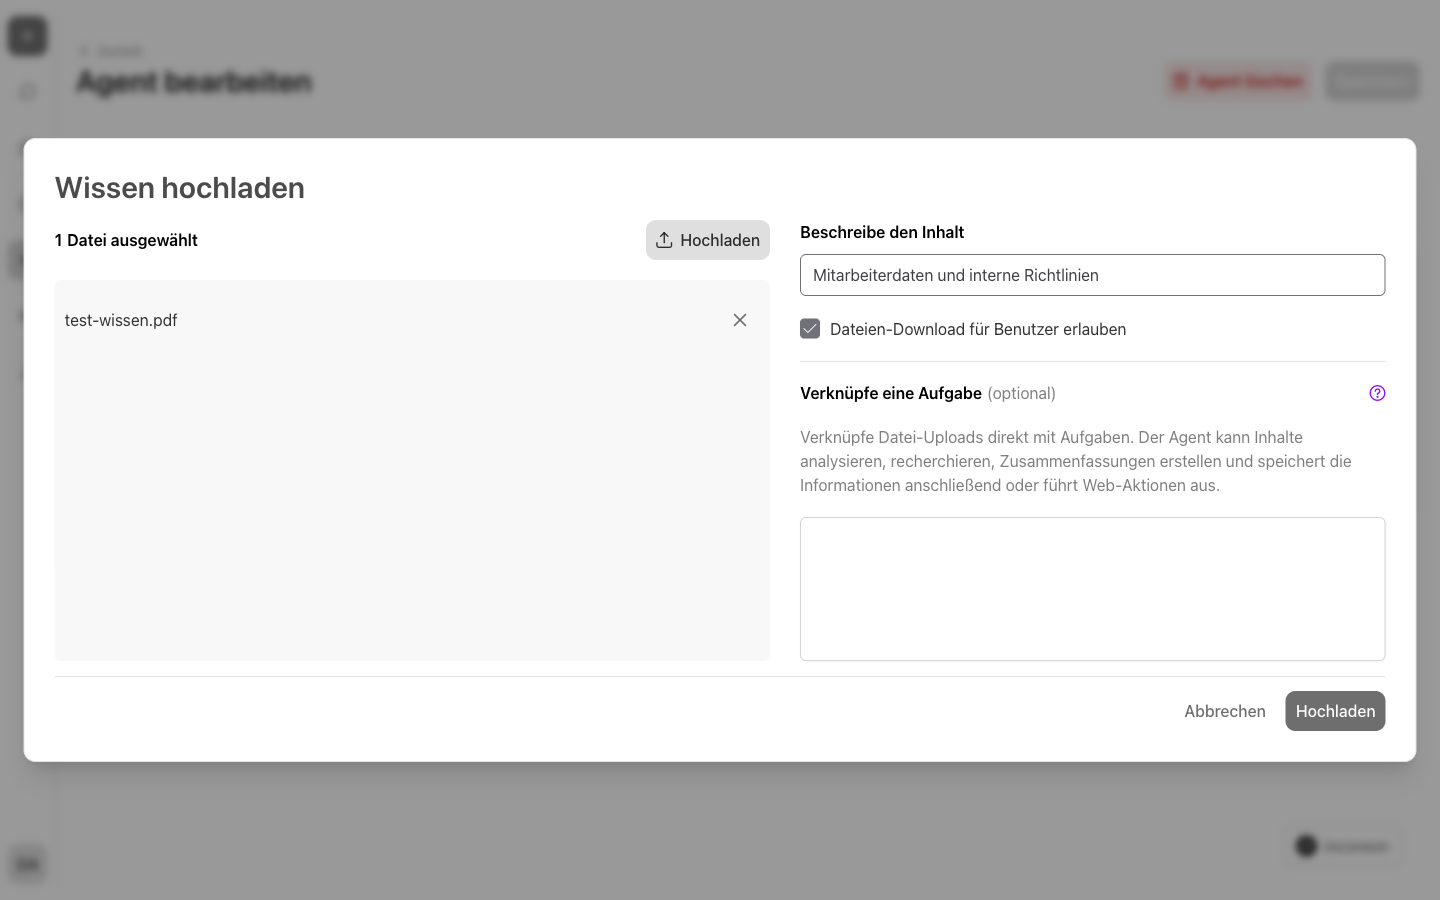
- The “Knowledge” area is opened, and “New group” is clicked. The “Upload knowledge” dialog opens.
- Under “Description”, it is briefly stated what the knowledge group contains, e.g. “employee data” or “policies”.
- The files of the knowledge group are uploaded. 20 MB is allowed per file; PDFs and documents with a maximum of 500 pages are processed.
- If users are allowed to download files from the group: the “Allow users to download files” option is enabled.
- If uploaded files are to be evaluated automatically: a task is defined under “Link task”, e.g. “Extract the monthly leasing rate, term, and annual mileage and store the information.”
- The dialog is confirmed. The knowledge group is created, and the files are processed in the background; the page can be left during processing.
Result: The knowledge group is now stored. For matching questions, the agent searches specifically in the group's files (see Adding Knowledge).
Guide: Setting Up and Filling the Agent Storage
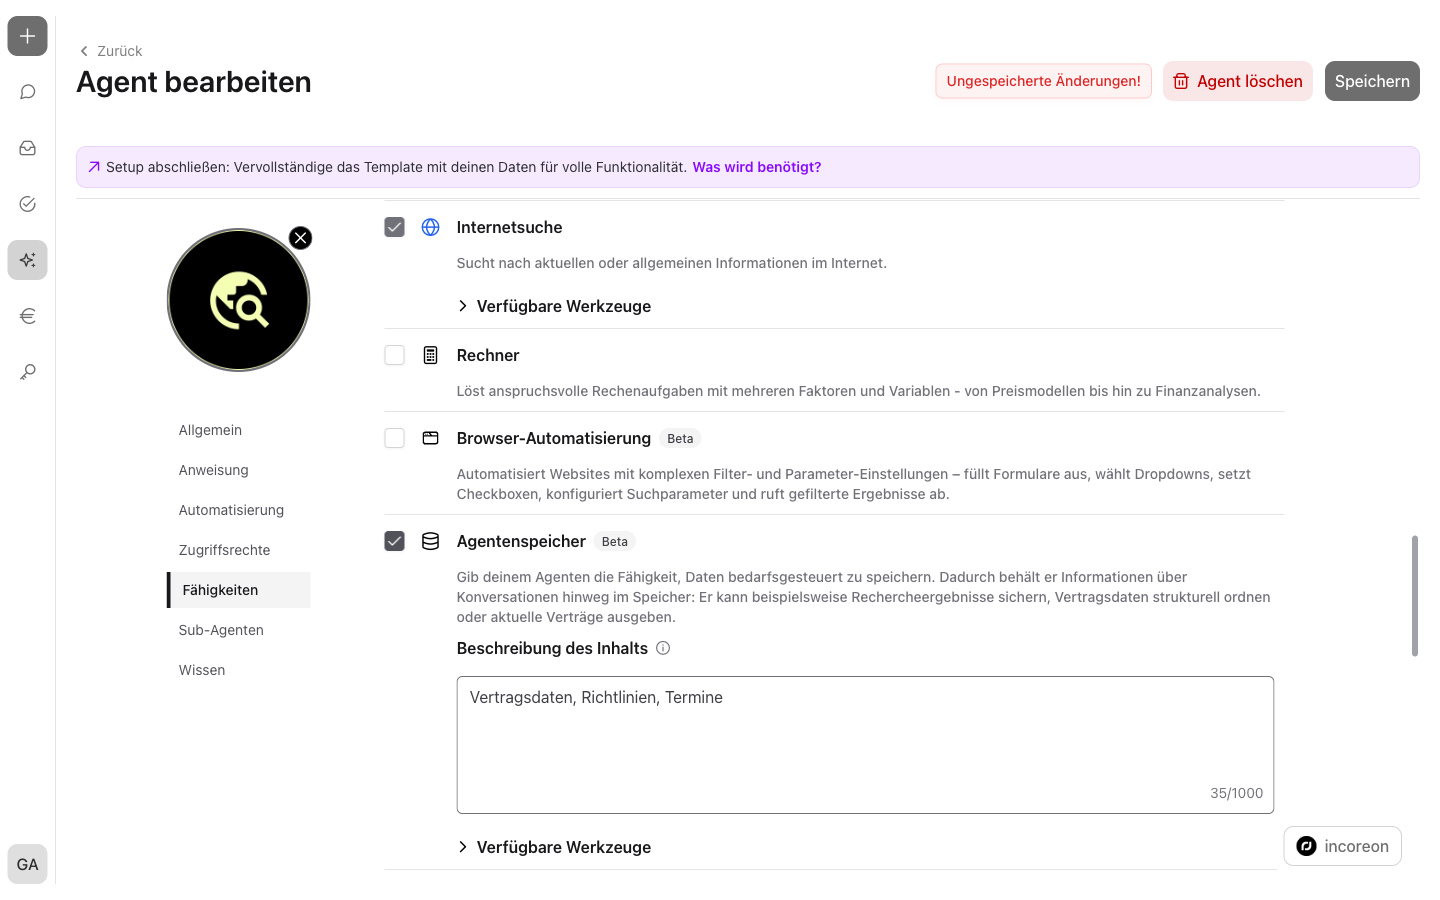
- The card of the agent is clicked in the agent overview. The configuration page opens.
- The “Tools” area is opened, and the “Agent storage” capability is enabled. The field for the description appears below the capability.
- The description of the content is stored, e.g. “contract data, policies, appointments”. The agent later uses the description like a table of contents.
- “Save” is clicked. The changes are applied.
- The agent is opened in the chat, and first entries are stored, e.g. “Store the contract data from the attached file.” The agent creates the entries and reports the result in the conversation.
- Retrieval is tested, e.g. with “Which contracts expire this year?”. The agent searches its stored entries and answers from the agent storage.
Result: The agent storage is now set up and filled. The agent retains the stored entries across conversations and retrieves them on request (see Agent Storage and Data Integration).
Guide: Setting Up Multi-Agent Workflows
- The workflow is broken down into subtasks – for example, research, review, and summary.
- A specialized agent is created for each subtask, or a suitable existing agent is selected. Only agents without own sub-agents are available as sub-agents.
- The card of the controlling agent is clicked in the agent overview. The configuration page opens.
- The “Sub-Agents” area is opened, and “Add” is clicked. The “Add sub-agents” dialog opens.
- The agents for the subtasks are selected and confirmed. The sub-agents appear in the controlling agent's list.
- It is ensured that the usage rights for all integrated sub-agents are in place. If a usage right is missing, the message cannot be sent in the chat (see Multi-Agent Systems and Sub-Agents).
- The controlling agent is tested in the chat with a typical request. Live activity cards show which sub-agents are working.
- If results do not fit, the instructions of the involved agents are refined, saved, and tested again.
Result: The controlling agent now delegates subtasks to the integrated sub-agents and combines the partial results into a joint answer.
Automation
Guide: Setting Up Automation
An automation connects a trigger with tasks: Every time the trigger is activated, the agent executes the tasks automatically. Incoming emails of a mailbox or a schedule serve as triggers.
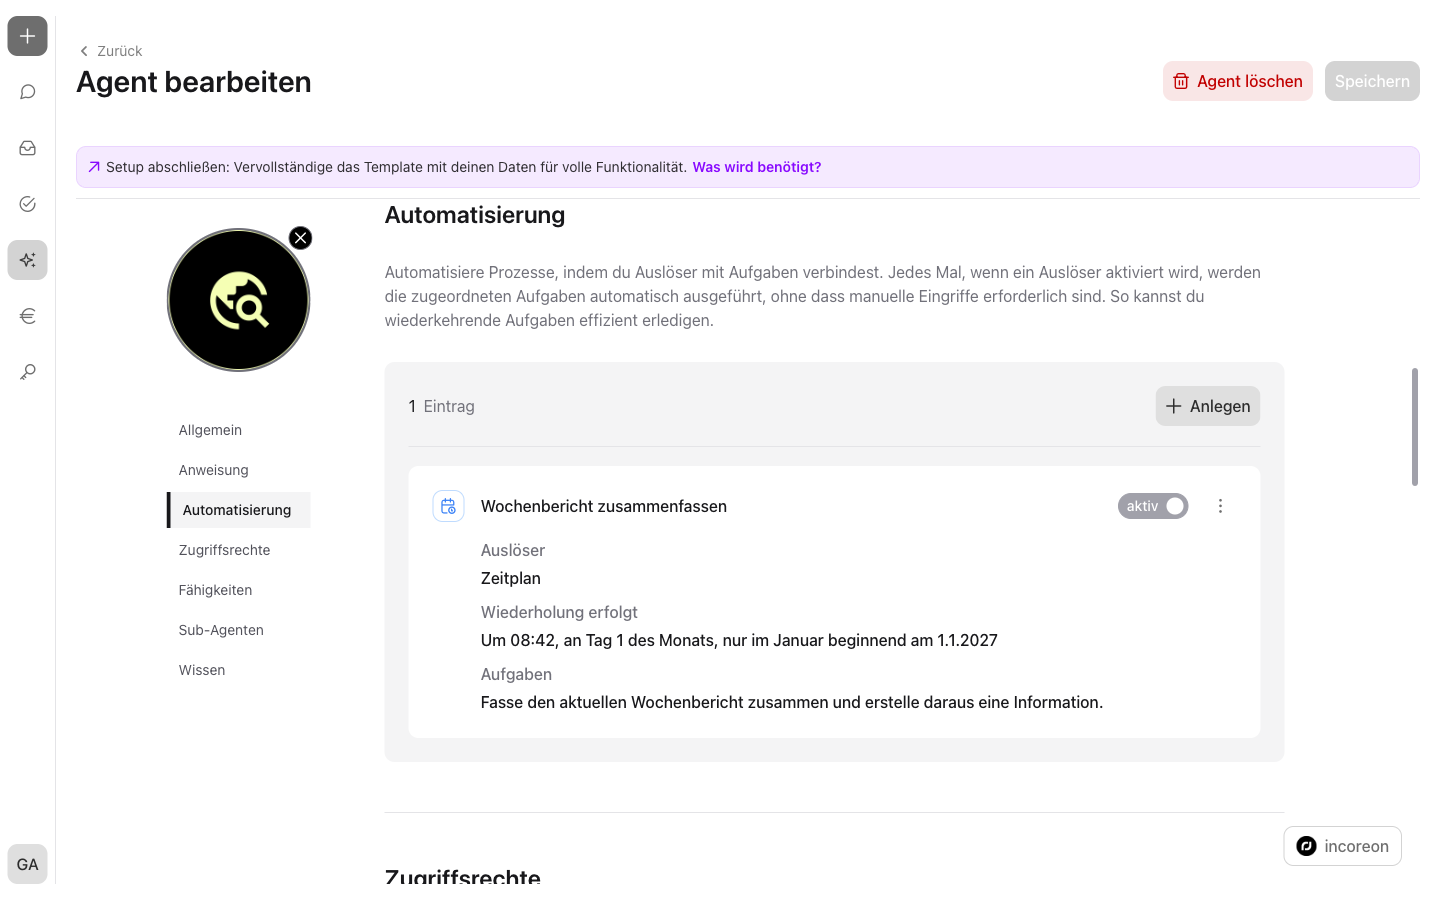
- The card of the agent is clicked in the agent overview. The configuration page opens.
- The “Automation” area is opened, and “New Automation” is clicked. The creation form opens.
- The name of the automation is entered.
- The trigger is defined. “Inbox” starts the automation on every incoming email of a mailbox; “Schedule” starts it at set times.
- If “Inbox” is selected: the mailbox is stored under “Received at” – as a Microsoft mail account via the sign-in or as an email provider with IMAP via email address and password.
- If “Inbox” is selected: “Check connection” is clicked. The test must pass – without a passed test, the automation cannot be saved.
- If “Schedule” is selected: start date, start time, and repetition are defined. The repetition may occur at most once per hour; incoreon shows it as readable text under “Repetition occurs”.
- At least one task is described under “What should the agent do?” – if needed with an @-mention of the recipients. What the agent creates from it, it decides on its own at runtime (see Defining Tasks for Automation).
- “Save” is clicked. The automation is saved and active afterward.
Result: The automation is now active and runs without manual intervention: Every time the trigger is activated, the agent executes the defined tasks and stores the results as information or to-dos. Each execution creates an automation chat that shows what the agent did on the last run. Every run consumes tokens and counts toward the agent's cost limit (see Keeping an Eye on Automation Costs).
Administration
Guide: Changing an Agent's Cost Limit
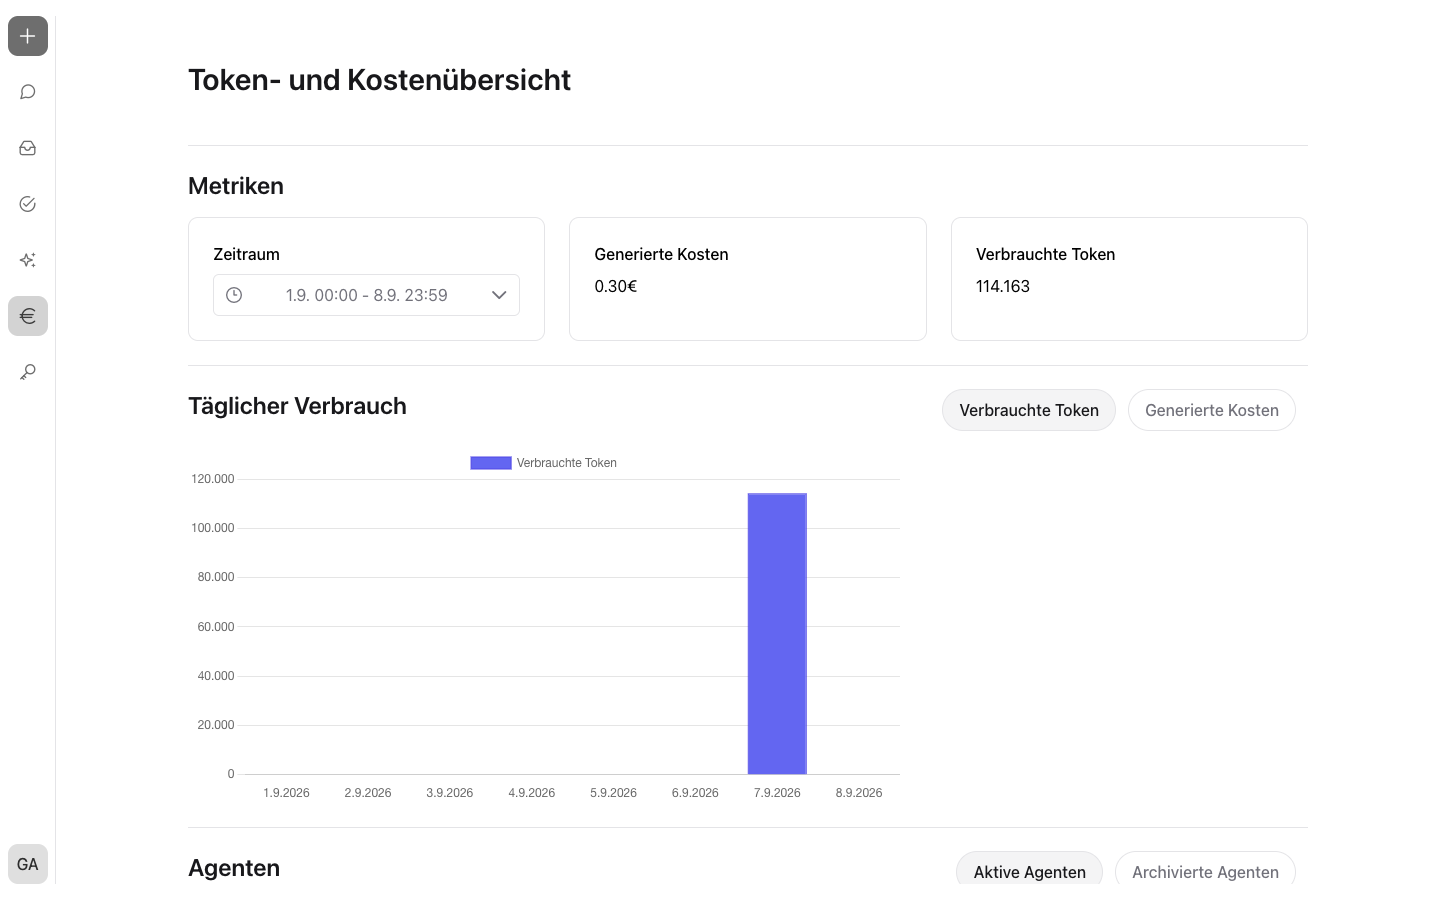
- The
 is clicked in the navigation. The token and cost overview opens.
 - In the “Agents” table,
 is clicked in the agent's row. A menu opens.
 - “Edit cost limit” is selected. A window opens with the agent's current costs, used tokens, and previous cost limit.
- The new amount in euros is entered under “Monthly cost limit”.
- If no cost limit is desired: the “Monthly cost limit” field is left empty. The agent is then unlimited.
- “Save” is clicked. A confirmation reports the change, and the “Agents” table shows the new cost limit.
Result: The agent's monthly cost limit is now changed. A new cost limit above the current month's consumption immediately lifts an existing block of the agent.
Guide: Setting the Period in the Token and Cost Overview
- In the “Metrics” area, the displayed period is clicked. The period selection opens.
- Under “Relative time”, a time is selected: “Today”, “Last 7 days”, “Last 30 days”, “This month”, or “This year”.
- If a custom time range is desired: under “Time range”, a start and end date are selected in the calendar. The preview shows the selected period.
- “Save” is clicked. Metrics, diagram, and table then show the values of the selected period.
A click on “Cancel” closes the selection without changes.
Result: The token and cost overview now shows metrics, diagram, and table for the selected period.
Guide: Creating an Email Provider
- “Add an email provider” is clicked. The “Create email provider” dialog opens.
- Under “Name”, a name is entered – for example, the name of the email service.
- Under “Receive settings (IMAP)”, server and port for the inbox are entered. The port must be between 1 and 65535.
- If emails should also be sent: the option “Mail settings (SMTP) - Optional” is activated and server and port are entered.
- “Add” is clicked. The provider then appears in the table.
Result: The new email provider now appears in the table and is available for selection in email automations.
Credentials such as email address and password are not stored with the provider, but when setting up the email automation – together with a connection test (see Guide: Setting Up Automation).
Guide: Creating a Group
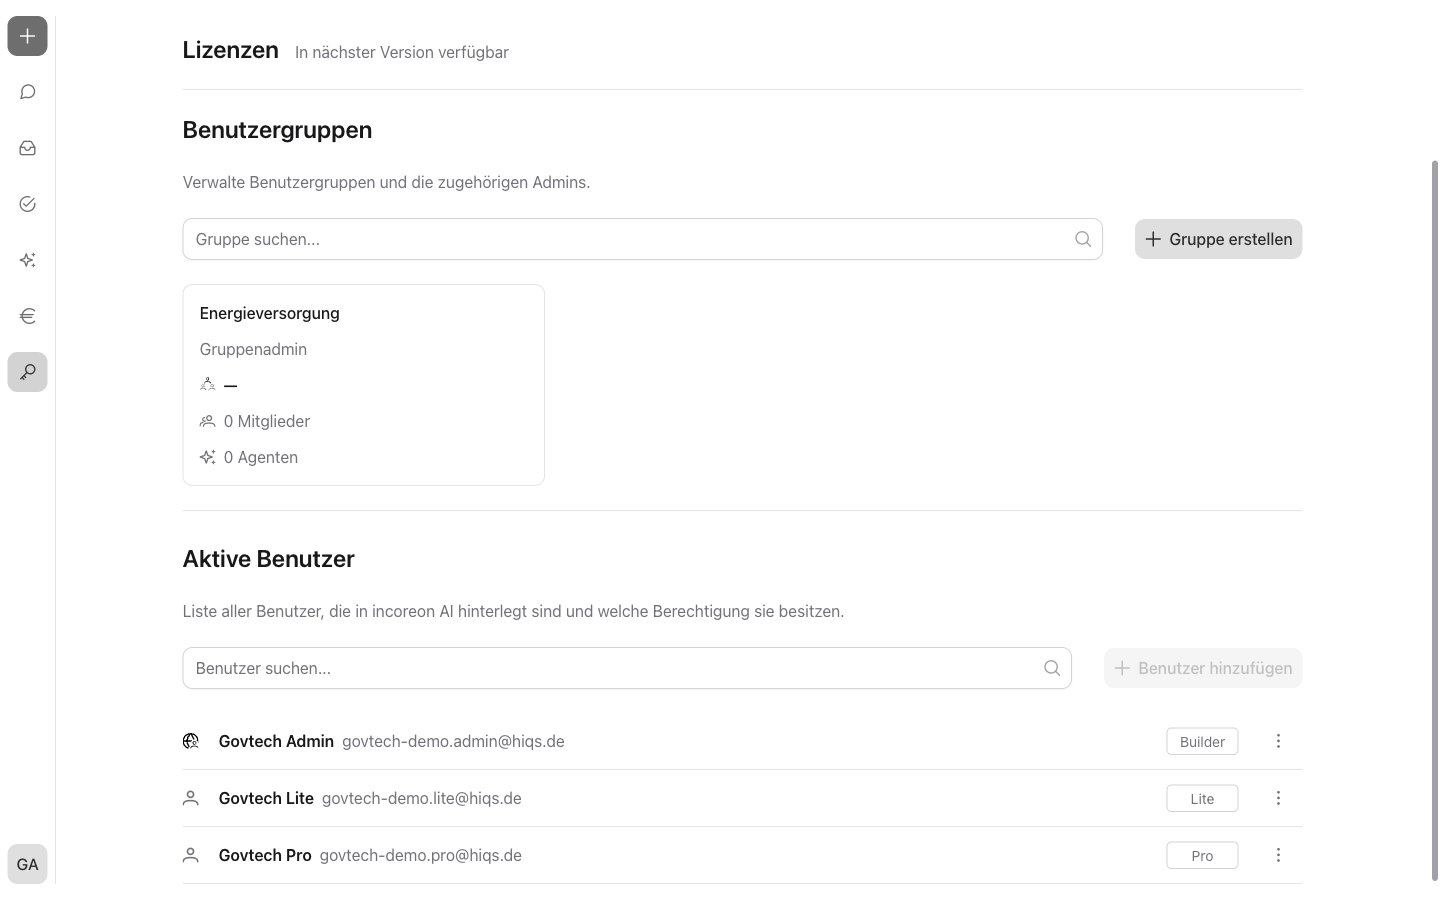
- The
 is clicked in the navigation. The “Permissions” area opens.
 - In the “User groups” section,
 “Create group” is clicked. The “Create group” window opens.
 - The group's name is entered under “Group name”.
- “Add” is clicked. The group page of the new group opens.
Result: The group has now been created. Members can be added afterward (see Guide: Adding Members to a Group).
Guide: Adding Members to a Group
- The is clicked in the navigation. The “Permissions” area opens.
- The group to which members are to be added is clicked. The group page opens.
- In the “Members” section, “Add members” is clicked. The “Add members” window opens.
- The user's name or email address is entered in the “Search user…” field. The list suggests matching users.
- If the role should differ: next to the selected user, the “Group admin” role is selected under “Select role”. “User” is preselected; “Group admin” is offered only for users with a Builder license.
- More users are added to the list in the same way.
- “Add” is clicked. The selected users appear in the member list on the group page.
- “Save” is clicked on the group page. The change is applied.
Result: The members now belong to the group. Members with the “Group admin” role can edit the agents whose editing rights lie with the group.
Guide: Changing a Group Member's Role
- The is clicked in the navigation. The “Permissions” area opens.
- The group is clicked. The group page opens.
- In the “Members” section, is clicked next to the member. A menu opens.
- “Make admin” or “Make member” is selected. The menu closes, and the member's role changes in the list.
- “Save” is clicked. The change is applied.
Result: The member now has the selected role.
Guide: Changing a User's Role
- The is clicked in the navigation. The “Permissions” area opens.
- In the “Active users” section, is clicked next to the user. A menu opens.
- “Edit user” is selected. The “Edit user” window opens.
- Under “User role”, the “Global administrator” or “User” role is selected. The window shows the rights of the selected role as a list.
- “Save” is clicked. A message confirms the change.
Result: The user now has the selected role.
Recommendations for Effective Use
These recommendations help to work more effectively with incoreon in day-to-day work.
Choosing the Right Agent
Specialized agents deliver more fitting answers than chatting without an agent – the chat then has no agent knowledge. Before a request, check whether a suitable agent exists. If results do not fit – for example, an incorrectly analyzed table – select a more suitable agent (see Selecting an Agent or Using Internet Search).
Keeping the Context Window Tidy
Start a new chat when the topic changes. If the context window is full, the notice “The conversation limit has been reached.” appears: have the most important results summarized in the chat and continue in a new chat with the summary (see When should I start a new chat?).
Saving Work Results
Have important results from the chat recorded directly: as information for others or as a to-do to work on. Recurring data – such as contract data – belongs in the agent storage; the storage's description works like a table of contents and determines how precisely the agent retrieves the data (see Information, To-Dos, and Agent Storage and Data Integration).
Organizing Chats in Projects
Set up one project per topic, customer, or process and assign the related chats. This keeps chats findable that arise from to-dos, information, or automations (see Organizing Chats in Projects).
Reviewing and Refining Answers
Agents do not always answer the same question identically. Review important results before passing them on. If answers do not fit, use  (“Try again...”) or formulate the request more concretely (see Reading and Using Answers).
Keeping an Eye on Costs
Every answer from an agent consumes tokens and causes costs – as does every run of an automation. Set cost limits per agent and check the token and cost overview regularly (see Cost Control).
Using Templates from the Agent Library
Instead of starting from scratch, adopt a suitable template from the agent library. Access rights are defined anew. Download the template's manual before first use and work through it – without completed setup, the template may work only to a limited extent (see Using the Agent Library and Templates).
Preparing Files Before Upload
Keep to the limits: at most 50 files of 20 MB each per message, PDFs and documents with at most 500 pages. Decrypt password-protected files beforehand, convert old formats – for example, DOC to DOCX – and split large PDFs into chapters (see Uploading Files and Troubleshooting and Support).
Recommendations for Secure Use
These recommendations help to keep data and access in incoreon protected.
Granting Access Rights Deliberately
Restrict usage rights to specific users and groups instead of releasing the agent for all users. Keep editing rights tight as well. An agent must be assigned to at least one user, one group, or all users for use (see Granting Access Rights).
Including Only Needed Capabilities
Every capability extends what an agent can do – from internet search to reading a mailbox. Define in the configuration which capabilities the agent may access, and include only the capabilities and sub-agents that the task needs (see Configuring Capabilities).
Regulating Data Sharing in the Instruction
Define in the instruction which data the agent may share and when it should ask questions if something is unclear. Such rules are among the recommended elements of an instruction (see Writing the Instruction).
Securing Custom MCP Servers
Custom capabilities run exclusively via encrypted HTTPS connections. Encrypt header values such as access keys – encrypted values are no longer readable afterward – and run “Test connection” before saving (see Adding Custom Capabilities via MCP Servers).
Sharing Chats Deliberately
The link to a shared chat is valid for 3 days; recipients import a copy, and new messages after sharing do not appear in the link. Share chats only with users of the same company who are allowed to see the content (see Sharing Chats).
Choosing the Login Mode Deliberately
The login mode defines which account a capability works with: with a shared account, the agent uses the same access for all users; with a personal account, each person connects their own account via their profile (see Choosing the Login Mode: Shared or Personal Account).
If an error occurs, the Troubleshooting and Support chapter helps with solutions for common problems and the support contact.